Pages

Tuesday, October 23, 2012

Halloween Decorating 2012

I loooooooove Halloween! It is one of my most favorite holidays and I love to decorate for it!
I have 2 shelves in my living room above our TV, the top one is used for books and right now is displaying a few chalkboards. And the bottom one I use as a mantle. It's been fun to switch things out on this shelf through out the year. Here it is all decked out for Halloween!
My husband and I are doing the Halloween countdown from Kiki & Company, you can see it there on the right. It is so much fun and each day we open a window and do a fun Halloween activity. We are loving it! The countdown can be downloaded for free from the link above. She has also created a kit you can purchase to go along with it, also at the link above. The kit includes lots of printables and this is where the EEK banner came from.
Here are a few more shots as the sun was going down:
It looks very pretty at night all light up, not that you could tell from the photo, but it is very pretty in real life!
I really love the two glitter pumpkins I found at Walmart for cheep. I made the chalkboard with Oct. 31 on it along with the other 3 on the shelf above. It's All About the Candy block came from a local decor shop. The tall BOO jar with the candle in it and the squaty one below that is empty I got our first Halloween we were married.
The black metal pumpkin was cut out of this shot but you can see it in the full view above. I found it last year at Tai Pan. The pretty green spider was made by my mom along with the purple one sitting on top of the Candy block on the other side but it's a little hard to see in the photos. And I made the spider web frame to hold Along Came A Spider from last year.
To the right of my TV is a small spot I like to decorate. Right now I've got my grapevine pumpkin all light up and inside the big frame, if you can't tell from the photo says Keep Calm and Scare On. I really do need to fill that little squaty jar, I was thinking green gum balls or something.
Day 8 of the countdown we had to find old Halloween pictures and display them. This is from 3 years ago, the first Halloween we were married. Danny was Rambo and I was some army girl. I surprised him and brought home a Nerf gun for his costume. He loved it!
Day 9 was to make a wall of bats. This is what I have so far, I really should cut out some more, but I kind of like it the way it is and it's still fun and festive.
On the opposite side of the room is this cute Trick or Treat banner which also came from Kiki & Company as well as the "Have Yourself a Spooky Little Halloween" print on the mantle. These are from her Halloween Pack she created last year. I did have a framed collage of my engagement photos I made there where the banner is but it fell down months ago and I have been too lazy to rehang it. I love the banner and it looks perfect here above the couch.
Beside the front door I have a spot to hold keys and this year I finally decided to decorate it for Halloween. Day 11 was to have a Halloween coloring contest, this is Danny's which I deemed the winner and put it in a frame to congratulate him. Day 10 was pick out your perfect pumpkin day so I've displayed them up here too. I totally can't wait to carve that little peanut shaped pumpkin!
And the last decoration I have to show you is my spooky BOO wreath I made last year. It is hanging on the door leading to the hall/bedroom. It's just too cute to put outside where no one will see it. It makes me smile every time I walk through there!
So far that's all my Halloween decorations! I love everything about Halloween and this year has been so much fun! I can't wait for tonight, it's a Blindfolded candy eating contest. Should be yummy!

What are you doing to celebrate Halloween? I would love to hear about your traditions.

Thursday, October 18, 2012

Apartment Decorating: Bedroom Curtains

The Evolution of a Room: Part 2

So I was writing this post and went to link to the photos of our first home and found that I never actually published that post which is why the tour when up Tuesday. And now this one is all linked and ready to roll out :)


I feel like I have said this millions of times but maybe I just think it a lot. But living in an apartment/rental can make decorating really hard. Especially if the place is like the apartment we live in now and doesn't allow holes.
In our first place the lease was really great and I could pretty much do anything I wanted regarding decor. Painting or other big changes were not an option but I could nail or drill anything I wanted into the walls. I didn't even think twice when I removed the cheap slatted blinds over the sliding door and replaced them with a rod and curtains or hung up chain link fence pipe as the rod in our bedroom.
Day one when we moved into our current place I was trying to hang a rod in our bedroom and Danny sat on the couch and read through our new lease where it stated what you could and could not do to the walls. Holes were a no! OOOOOPS! Good thing I didn't get very far.... I quickly filled in the couple of holes that I made and we never spoke of it again. Our curtains stayed folded up in the closet and our apartment stayed plain and booooooring!
 
 
While browsing around for sheets one day I saw on the clearance rack a couple of sheer panels. I have always wanted sheer curtains to go behind my regular curtains. I love the light that comes through the sheer panels while still blocking any view of the inside of my house to the outside peeping public.
Here is a picture I found on Google; not the best, but you can sort of see the look I wanted.
source
They were on clearance so I picked them up not knowing how I would be able to use them. Then after over a year of hating our new place because it didn't have any personality I pulled all my curtains out of the closet and tried to figure out how to hang them. I was really upset that I couldn't use the rods we already had but I was determined to find something and on the cheep! Then it hit me:
Tension rods!
I don't know why I didn't think of it before... I have always had this idea of using a tension rod for a sheer panel and then my pretty rod for the regular panels so I don't know why this didn't hit me sooner. I went on the hunt for tension rods. I found a couple really cheep for the living room windows. They are standard single windows. But the one in our bedroom is huge and I couldn't find a rod that would fit and not be like 20 bucks, which for me is way too much moolah.
And then I had another BRILLIANT idea! I figured if a shower curtain rod could reach across the distance between the two walls in my bathroom then couldn't that also fit my large window? It seemed to be about the same distance... Lucky for me about the same time I had this wonderful revelation our friends were moving into their new home and it had two brand new shower rods. She didn't want or need her old one so she gave it to me! I was totally stoked to try it out in my room and sure enough it fit perfectly inside my window!
I made the regular curtains for our bedroom in our first house and they had to fit over the chain link fence pole so they went on easy but it took a little pulling and twisting to get the end cap off one of the sides so the sheer panels would actually go on. I sandwiched the sheer panels in between the regular ones to achieve the look that I wanted.
When closed the sheer panels are bunched in the center so the others can't close completely but it's no big deal! I love that people walking by outside can't see into my room and Kokua and Kapone can still look out just fine. I LOVE THEM! It's beautiful in the day and keeps that pesky orange light from shining in my eyes at night!
It feels like a totally different room; I'm so happy I finally added something to spruce things up.
I will show you how I livened up the living room once I get pictures taken of those windows!

And because I can't help myself: here is Kapone nibbling on Kokua's ear. I promise, she loves this!
Have you added anything fun to a room in your house lately or had any brilliant ideas? I'd love to hear all about it!
Linking up at:

Tuesday, October 16, 2012

OUR FIRST HOME: a tour


I recently found this post that I thought I published a long time ago... Here is a tour of our first home right before we moved out.


If you don't know this about me already, I'm a little OCD and I tend to go overboard for absolutely no reason and do things that normal people just would never care to do.... Case and Point: here is the floor plan to our home.
I don't know anyone else that would spend all night sketching this just because I thought it would be fun and I thought I needed it.....
PS: I am in no way an artist or a good drawer at all, so please, don't judge me :)
I forgot to get a photo of the front, so I cheated....
Okay so, let me take you on a tour of our first home!
Welcome! This is our home!
We live on the bottom level of this lovely 4 plex and that open garage door happens to be ours. One great thing about this place is all the parking, there is this driveway and the carport between the house and the garage.
So now that you found a place to park your car.... Let's go through the front door
It took us about 15 months to get this place looking like a home.
It was a lot of fun, we gathered things little by little and eventually we were able to make this feel like our home.
Don't just stand there, take a seat.
We didn't have a couch starting out, we had one piece of furniture,
THE FAT SACK. 
It was awesome! But there came a time when we decided we needed a little bit more :)
We spend a lot of time hanging out here chatting, reading and watching TV.
Take a few steps to the right and visit our kitchen.
Check out all that counter space and all those beautiful cabinets.
Just sit down here, in our dining room, while I make you something:
Don't mind Kokua, she will move for you....
Wait a minute while I whip up some cookies for you in my most favorite spot in the house.
Now that your tummy is satisfied it's time to see the rest of the place....
let's go
you will find this
This door stays shut unless we are hunting for something in there :)
Then
This is our Bedroom!
Nice and cozy and those curtains.... just what I needed to block out that sunlight, lots of peaceful sleeps thanks to those.
As you can see, Kokua loves to follow me around...
 And the bathroom.... many hours spent in here getting beautified. This is also the spot where my girls and I got ready the morning of my wedding. Such special memories!
This place has been so much fun! It was way more space then we needed but it was an answer to our prayers and the perfect place to live our first year together!
Now lets go back out and
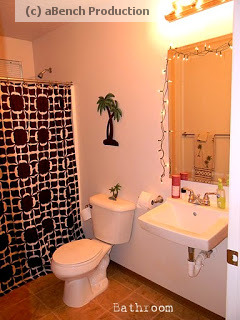
Here is our extra Bathroom
It's decorated and there is even soap and shampoo but we have never used that shower :)
And last of all.... the puppies room!
Kapone is my "King of Fuzz" and I just can't keep up with him. I don't know where he get's it all, I swear it appears out of thin air!
And here we are back at the front door.
Thank you for visiting!!! I'm so glad you stopped by!
Come back and see us anytime at our NEW place!

Monday, September 10, 2012

FFA Challenge #3

The Evolution of a Room: Part 1

FFA Challenge #3: Pick a Room, Any Room
FFA-Vintage Revivals-1[3]_thumb


Today's challenge is to pick a room that you want to focus on.  If you are nervous about it to the point that you don’t think you can go through it then pick a room that not everyone will see all the time.  But don’t be scared!
In challenge #1 you defined what you want your house to FEEL like.
In challenge #2 you defined your style more in depth, and today we are going to start doing stuff!!

Okay so the room I chose for this challenge is my bedroom! I really wanted to tackle my living room but sense that room and the dining area and the kitchen are all pretty much the same room I thought that would be a little too much for me to handle all at once. SO the bedroom it is!!

Here are the BEFORE photos and I hope to have some great AFTERS or at least some DURINGS pretty soon!!


Welcome to my boring bedroom:

Now here are some shots going around the room.
 
A few problems we have is that we live in a 1 bedroom apartment with absolutely no storage, we can't put any holes in the walls for decorations and the dogs kennels have to be in our bedroom.
 
I really love how these pictures make this room look so big! It's awesome; it doesn't feel as big as it looks in person; if that made any sense.
Well that's what I've got so far; check back for updates as the room evolves!


And because I love her; here is a picture of me and my girl Kokua:


Thursday, May 17, 2012

FFA Challenge #2

Okay, so for the 2nd FFA Challenge over at Vintage Revivals there is a cool little style quiz at HomeGoods.

Style Quiz Header

I took the quiz and here are my results:


April, You Are A GLAMOROUS CLASSIC

You have a refined sensibility with an appreciation for history and tradition in your furniture and your rooms. You value beauty and craftsmanship. You are visually sensitive and understand how symmetry and a balanced layout give order to a room. But you definitely like to shake things up with some unabashed luxury and glamour to keep things from getting boring. You go for rich materials like velvets, one-of-a-kind objects, lady-like touches, glimmering accessories, and a sense of old-Hollywood romance that makes your home dramatic and elegant.
You value order. You feel happiest if your home is well organized. You understand that when your house is in order, your mind feels clearer. Rather than a lot of meaningless objects or overly-designed items, you are happier with a few well-placed things. Your home is your respite from a busy life. Try to avoid letting things into your home that you don't really love.
Your Happy Home Colors


Blue
Putting Color to Use!
Don't forget that color looks best when paired with some neutrals for a little visual relief. If you go wild on the walls or with your upholstery, pull back a little on the rugs or curtains or vice versa. Each room can definitely have its own color palette, but think of your home as a whole, with each room transitioning to the next. Some tricks: go for fairly neutral hues in hallways, or add some colors from one room into the neighboring room, even in the form of accessories or fabrics.


Putting Your Style to Work!
With your style and needs in mind, here are a few tips that will help you make your home a little happier.
1. Your Design Challenge: MAXIMIZEDesign is all about tricks, and with small spaces, the game is to literally trick the eye. Mirrors obviously expand a sense of space, and if possible, place them across from windows so they pick up the light and the outdoors. Leggy furniture gives the illusion of more space, as you can see under it. And, a mix of upholstered and non-upholstered pieces also makes a room feel less dense. Also, consider multi-tasking furniture, like a dining table pushed against the wall—it can be a desk by day and gets pulled out for dinner parties. Or a bedside table big enough to accommodate a chair and function as a desk.
2. Your Happy PlaceThink of your outdoor space, no matter how small, as rooms, and create distinct areas. A pair of chaises flanking a little side table makes a living room. A lantern hanging from a tree or pergola over a table and chairs makes a dining room. A cluster of potted plants on a patio can create a cozy nook, and a single urn or bench placed at the far end can draw your eye, making a space seem longer. Big lanterns with candles sitting on the ground create a sense of space and give beautiful light. Try out new ideas before you start shopping by taking a photo of your area and laying some tracing paper over the print to draw whatever you're planning first.
3. Be Party-Ready All the Time!Scent: The first thing you notice about a home is how it smells. Use naturally fragrant cleaning products. If you find a scented candle or fresh potpourri you love, stock up on it. Any scent you like, whether perfume or linen spray, can be used on upholstery, bedding or just spritzed into the air.

Mood: Nice, flattering light makes us feel good. So nix the harsh, direct light from overhead fixtures in favor of the softer glow from floor and table lamps. Also, stock up on some votive candles and a couple of hurricane lanterns for setting around the room.

Food: Devote space in your pantry or on a shelf for go-to party essentials: crackers, dip, chips, nuts—whatever you like to serve. Keep on hand a collection of attractive bowls and cocktail napkins, and you'll be able to set a spread—instantly!

Drink: The simplest and chicest thing is to have a drinks tray or table always set up. Include a mix of pretty glasses, an ice bucket, a lovely pitcher, and bottles of soda and water. When the bell rings, just add ice and limes.


Take the quiz for yourself HERE!


Wednesday, May 2, 2012

Super Cool Site!

Are you wanting to paint a room in your house or even the outside of your house but can't decide on the color? Take this site for a test drive: https://secure.olympic.com/colorclix/colorclix-online

I was in reader one day looking through my unread blog posts and came across a post about ColorClix. I wish I could remember who posted it so I could link you to her site but I can't remember.
She was trying to chose paint colors for her daughters room and used this tool to help her. Of course I wanted to try it so I uploaded a photo and in about 5 minutes had awesome new paint on the walls.

The before is a photo I took of our old place.


Wow! I know those colors aren't for everyone and I probably wouldn't seriously do that exactly but man, I wish I could have painted that place! I do really love that GREEN!

And here is a house I found on the MLS that is for sale. I think they needed a little color to all that grey.

I think I prefer this house green.
Anyway.... I had fun playing on this site and just thought you might too. LATER GATOR!

Tuesday, May 1, 2012

FFA Challenge #1

I decided to join a club! FFA over at Vintage Revivals.
So for the FIRST CHALLENGE:
Catch A Dream
Today you get to write about YOUR personality traits. What are some of your favorite things about yourself?
And decide how you want your home to feel.

I think my favorite trait about myself is that I am a happy person and always positive. That is how I want my home to feel; happy, cheerful and welcome to anyone. I want to feel a positive energy when you walk through the door but calming and peaceful as well. I am unique and not afraid to be daring which is reflected in the way I dress and the fact that my hair style/color changes with the seasons.
I wish I had the same confidence when I decorate my home because I do not want my home decor to look safe and boring I want to take risks and be daring. I am so ready to get away from the safe dull colors I am surrounded by now. I love bright bold patterns and colors but you wouldn't know it by walking into my home and it's starting to drive me nuts! I live in an apartment which can be very restricting when it comes to decorating, I can't even put a hole in the wall to hang a photo. This place also has about zero storage; so that has been a hard battle to fight. I hope these challenges can be a catalyst in helping me break free from the decorating rut I am in.
This challenge already was awesome in helping me work through my foggy brain to find out what I really want!
I hope this blog can be a resource for other apartment dwellers just like me wishing they had their very own walls to splatter paint at. But alas; the walls will stay forever cream...... and it's not the end of the world, there are plenty of other things I can do to make this place awesomely mine! I hope you stay with me for the journey.